Importing Scenes
Crown can import most useful elements from 3D scenes saved in FBX or OBJ format. The sections below refer mostly to FBX models because FBX is the most popular format, but the same principles apply to other supported formats. Specific formats are mentioned where necessary.
FBX import dialog
When you import an FBX file, Crown opens a dialog where you can select import options and choose which parts of the scene to bring into the project. The FBX import dialog is divided into two main sections:
Units: import geometry, lights, cameras, materials and any associated textures.
Animation: import skeleton and animation clips. If your scene contains no animations, you can ignore this section.
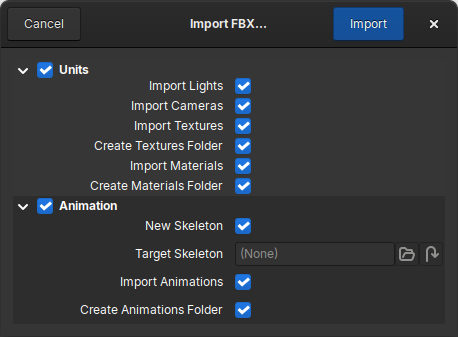
The FBX import dialog.
Preparing Models for Export
Crown uses Y-forward Z-up axes. To keep models correctly oriented after import, use those axes when exporting from DCC programs whenever possible.
This is especially important when working with OBJ scenes, because the format generally does not store the axes used at export time. In that case, Crown has no way to automatically detect whether it should insert an extra root node to correct the orientation. FBX scenes, on the other hand, include this information, and Crown uses it to insert a corrective root node when necessary. Even so, it is best to export with settings that match Crown’s conventions.
The settings below are Blender-specific. Other 3D applications may expose the
same export choices under different names. For both FBX and OBJ exports, set
Forward to Y and Up to Z.
FBX
When exporting FBX files, also set Apply Scalings to FBX Units Scale.
This causes the FBX file to store meter units, which matches Crown’s importer
and avoids an extra root unit.

Blender FBX export settings for axes and unit scaling.
OBJ
For OBJ exports, enable PBR Extensions under Materials when the option
is available; otherwise, some texture maps may go undetected by the importer.

Blender OBJ export settings for axes and material metadata.
One FBX per clip
A common workflow for animated 3D models is to export the geometry and skeleton together in one FBX file, and export each animation clip as a separate FBX file. Crown supports and recommends this approach because it simplifies asset management and make faster iterations possible.
To import models organized in this way, always follow these 2 steps:
1) Importing geometry and skeleton
Start by importing the FBX that contains the geometry and skeleton. In the
Project Browser create or select the target folder, make sure Import
Animations is unchecked, then click Import to begin:

Disabling animation import when importing geometry and skeleton.
When the import completes, the unit (geometry), the skeleton, and any other objects you selected in the Unit section will appear as separate items in the Project Browser:

Imported unit, skeleton, and related resources in the Project Browser.
2) Importing animation clips
After importing geometry and skeleton, import the FBX files that contain the
individual animation clips. Right-click the same folder, choose
Import..., and select the FBX files with the clips. In the importer
dialog:
Uncheck the entire Unit section to avoid importing any undesired resource.
Uncheck
New Skeletonto indicate that the skeleton already exists.Set
Target Skeletonto the skeleton you imported in the previous step.

Selecting the target skeleton when importing animation clips.
When the importer finishes, it creates an animations folder and places the
imported clips inside it, with correct references to the existing skeleton and
geometry:

Imported animation clips in the dedicated animations folder.
Importing LODs
Crown generates a LOD Group component in the root unit and populates it
automatically when it detects the imported model contains LODs.
A model can explicitly mark a mesh as LOD in a group by adding a _LODx
suffix to its name. The x in the suffix can be any non-negative number and
can be zero-padded (e.g. _LOD01). LODs can start at any number but there
must be no gaps between successive LODs.